 nginx
nginx
# 安装nginx
安装pcre ,perl兼容正则表达式
yum install pcre pcre-devel openssl-devel gcc -y

useradd www -s /sbin/nologin -M
cd nginx-1.16
./configure --prefix=/opt/nginx --user=www --group=www --with-http_ssl_module --with-http_stub_status_module --with-stream

--user=nginx --group=nginx --prefix=/workspace/prod/app/nginx --with-stream

make && make install
/opt/nginx/sbin/nginx -c /opt/nginx/conf/nginx.conf
./nginx -s reload

vim /etc/profile
export PATH=/opt/nginx/sbin:$PATH
export PATH=/opt/php/bin:$PATH
2
3
4
5
6
7
8
9
10
11
12
13
14
15
编绎选项
./configure --prefix=/usr/share/nginx --sbin-path=/usr/sbin/nginx --modules-path=/usr/lib64/nginx/modules --conf-path=/etc/nginx/nginx.conf --error-log-path=/var/log/nginx/error.log --http-log-path=/var/log/nginx/access.log --http-client-body-temp-path=/var/lib/nginx/tmp/client_body --http-proxy-temp-path=/var/lib/nginx/tmp/proxy --http-fastcgi-temp-path=/var/lib/nginx/tmp/fastcgi --http-uwsgi-temp-path=/var/lib/nginx/tmp/uwsgi --http-scgi-temp-path=/var/lib/nginx/tmp/scgi --pid-path=/run/nginx.pid --lock-path=/run/lock/subsys/nginx --user=nginx --group=nginx --with-compat --with-debug --with-file-aio --with-google_perftools_module --with-http_addition_module --with-http_auth_request_module --with-http_dav_module --with-http_degradation_module --with-http_flv_module --with-http_gunzip_module --with-http_gzip_static_module --with-http_image_filter_module=dynamic --with-http_mp4_module --with-http_perl_module=dynamic --with-http_random_index_module --with-http_realip_module --with-http_secure_link_module --with-http_slice_module --with-http_ssl_module --with-http_stub_status_module --with-http_sub_module --with-http_v2_module --with-http_xslt_module=dynamic --with-mail=dynamic --with-mail_ssl_module --with-pcre --with-pcre-jit --with-stream=dynamic --with-stream_ssl_module --with-stream_ssl_preread_module --with-threads --with-cc-opt='-O2 -g -pipe -Wall -Wp,-D_FORTIFY_SOURCE=2 -fexceptions -fstack-protector-strong --param=ssp-buffer-size=4 -grecord-gcc-switches -specs=/usr/lib/rpm/redhat/redhat-hardened-cc1 -m64 -mtune=generic' --with-ld-opt='-Wl,-z,relro -specs=/usr/lib/rpm/redhat/redhat-hardened-ld -Wl,-E'
# nginx重定向
# 2.1 rewrite重定向
url重写是指通过配置conf文件,以让网站的url中达到某种状态时则定向/跳转到某个规则,比如常见的伪静态、301重定向、浏览器定向等
rewrite语法 在配置文件的server块中写,如:
server { rewrite 规则 定向路径 重写类型; } 规则:可以是字符串或者正则来表示想匹配的目标url 定向路径:表示匹配到规则后要定向的路径,如果规则里有正则,则可以使用$index来表示正则里的捕获分组 重写类型: last :相当于Apache里德(L)标记,表示完成rewrite,浏览器地址栏URL地址不变 break;本条规则匹配完成后,终止匹配,不再匹配后面的规则,浏览器地址栏URL地址不变 redirect:返回302临时重定向,浏览器地址会显示跳转后的URL地址 permanent:返回301永久重定向,浏览器地址栏会显示跳转后的URL地址
# 2.2 重定向所有请求到特定网址
这将所有传入请求重定向域名给url http://anotherdomain.com/dir1/index.php,如下配置。
server {
    listen 192.168.1.100:80;
    server_name mydomain.com;
    return 301 http://anotherdomain.com/dir1/index.php;
}
2
3
4
5
# 2.3 重定向所有请求其他域名
这将在域名中的所有传入的请求重定向到另一个域名(http://anotherdomain.com/)与相应的请求的URL和查询字符串。
server {
    listen 192.168.1.100:80;
    server_name mydomain.com;
    return 301 http://anotherdomain.com$request_uri;
}
2
3
4
5
# 2.4 将请求重定向与特定协议
这将在域名中的所有传入的请求重定向到另一个域名(http://anotherdomain.com/)与相应的请求的URL和查询字符串。它也将使用重定向的URL相同的协议。
server {
    listen 192.168.1.100:80;
    server_name mydomain.com;
    return 301 $scheme://anotherdomain.com$request_uri;
}
2
3
4
5
域名 www.taobao.com 跳转到www.baidu.com
server {
    listen 80;
    server_name www.taobao.com;
    rewrite ^/(.*) http://www.baidu.com/$1 permanent;
}
2
3
4
5
# nginx代理参数
proxy_redirect off;
proxy_set_header Host $host;
proxy_set_header X-Real-IP $remote_addr; #获取真实ip
#proxy_set_header X-Forwarded-For $proxy_add_x_forwarded_for; #获取代理者的真实ip


client_max_body_size 256m;
client_body_buffer_size 128k;

proxy_connect_timeout 90;
proxy_send_timeout 90;
proxy_read_timeout 90;
proxy_buffer_size 4k;
proxy_buffers 4 32k;
proxy_busy_buffers_size 64k;
proxy_temp_file_write_size 64k;
2
3
4
5
6
7
8
9
10
11
12
13
14
15
16
跳转加端口 proxy_set_header Host $host:$proxy_port;
# nginx屏蔽客户端浏览器
搞过前端的估计都碰到最头疼的问题就是浏览器兼容性问题了,特别是针对IE浏览器。往往前端为了省事就搞一个页面提示用户升级浏览器或者显示简单的静态页面。那接下来就需要运维来配置nginx rewrite规则了。
在这里直接贴出配置实例
server {
listen 80;
server_name xxx.xxx.com;
root   /www ;

if ( $http_user_agent ~* “MSIE [6-9].[0-9]”) {
rewrite   /ie.html break;
}
}
2
3
4
5
6
7
8
9
解释一下上面的配置
$http_user_agent 客户端agent信息(这个是浏览器的标识,如果你开了访问日志的话,可以去看一下。每种浏览器的标识可能都不一样。)
~* 使用正则表达式,并且不区分大小写
MSIE [6,7].[0-9] MSIE-IE浏览器的标识,这里匹配的是IE浏览器在版本在6到9的,例如6.1,7.0,8.2等等···
rewrite /ie6.html 只要匹配则返回指定的静态页面
break 停止执行当前这一轮的ngx_http_rewrite_module指令集
如果需要验证是否生效的话,这里提供一个比较方便的工具 IETester,可以模拟IE任意版本的浏览器来测试
# logrotate日志切割
/var/log/nginx/*.log {
weekly
missingok
rotate 52
compress
delaycompress
notifempty
create 0640 www-data adm
sharedscripts
prerotate
if [ -d /etc/logrotate.d/httpd-prerotate ]; then
run-parts /etc/logrotate.d/httpd-prerotate;
fi
endscript
postrotate
[ -s /run/nginx.pid ] && kill -USR1 cat /run/nginx.pid
endscript
}
# nginx启动脚本
# 6.1 centos6启动脚本
#!/bin/bash
#
nginx - this script starts and stops the nginx daemin
#
# chkconfig:   - 85 15

# description:  Nginx is an HTTP(S) server, HTTP(S) reverse \

#               proxy and IMAP/POP3 proxy server

# processname: nginx

# config:      /opt/nginx/conf/nginx.conf

# pidfile:     /opt/nginx/logs/nginx.pid

# Url http://www.xnuo.top

# Last Updated 2020.12.22

# Source function library.

. /etc/rc.d/init.d/functions

# Source networking configuration.

. /etc/sysconfig/network

# Check that networking is up.
[ "$NETWORKING" = "no" ] && exit 0

nginx="/opt/nginx/sbin/nginx"
prog=$(basename $nginx)

NGINX_CONF_FILE="/opt/nginx/conf/nginx.conf"
NGINX_PID="/opt/nginx/logs/nginx.pid"

[ -f /etc/sysconfig/nginx ] && . /etc/sysconfig/nginx

lockfile=/var/lock/subsys/nginx

start() {
    [ -x $nginx ] || exit 5
    [ -f $NGINX_CONF_FILE ] || exit 6
    echo -n $"Starting $prog: "
    daemon $nginx -c $NGINX_CONF_FILE
    retval=$?
    echo
    #service php-fpm start
    [ $retval -eq 0 ] && touch $lockfile
    return $retval
}
stop() {
    echo -n $"Stopping $prog: "
    $nginx -s stop
    echo_success
    retval=$?
    echo
    #service php-fpm stop
    [ $retval -eq 0 ] && rm -f $lockfile
    return $retval
}

restart() {
    stop
    start
}

reload() {
    configtest || return $?
    echo -n $"Reloading $prog: "
    $nginx -s reload
    RETVAL=$?
    echo
}

force_reload() {
    restart
}

configtest() {
  $nginx -t -c $NGINX_CONF_FILE
}

rh_status() {
    status $prog
}

rh_status_q() {
    rh_status >/dev/null 2>&1
}

case "$1" in
    start)
        rh_status_q && exit 0
        $1
        ;;
    stop)
        rh_status_q || exit 0
        $1
        ;;
    restart|configtest)
        $1
        ;;
    reload)
        rh_status_q || exit 7
        $1
        ;;
    force-reload)
        force_reload
        ;;
    status)
        rh_status
        ;;
    condrestart|try-restart)
        rh_status_q || exit 0
            ;;
    *)
        echo $"Usage: $0 {start|stop|status|restart|condrestart|try-restart|reload|force-reload|configtest}"
        exit 2
esac
2
3
4
5
6
7
8
9
10
11
12
13
14
15
16
17
18
19
20
21
22
23
24
25
26
27
28
29
30
31
32
33
34
35
36
37
38
39
40
41
42
43
44
45
46
47
48
49
50
51
52
53
54
55
56
57
58
59
60
61
62
63
64
65
66
67
68
69
70
71
72
73
74
75
76
77
78
79
80
81
82
83
84
85
86
87
88
89
90
91
92
93
94
95
96
97
98
99
100
101
102
103
104
105
106
107
108
109
110
111
112
113
114
115
116
117
# 6.2 centos7启动脚本
vim /lib/systemd/system/nginx.service

[Unit]
Description=nginx
After=network.target

[Service]
Type=forking
ExecStart=/opt/nginx/sbin/nginx
ExecReload=/opt/nginx/sbin/nginx reload
ExecStop=/opt/nginx/sbin/nginx quit
PrivateTmp=true

[Install]
WantedBy=multi-user.target
2
3
4
5
6
7
8
9
10
11
12
13
14
15
# 设置nginx为http文件服务器
server {
listen 80;
server_name localhost;
root /yumrepo;
charset utf-8,gbk;
#access_log logs/host.access.log main;
location / {
autoindex on;
autoindex_exact_size off;
autoindex_localtime on;
}
}
2
3
4
5
6
7
8
9
10
11
12
# 配置fastcgi
fastcgi_connect_timeout 300;
fastcgi_send_timeout 300;
fastcgi_read_timeout 300;
fastcgi_buffer_size 64k;
fastcgi_buffers 4 64k;
fastcgi_busy_buffers_size 128k;
fastcgi_temp_file_write_size 128k;

server {
    location / {
        fastcgi_pass  localhost:9000;
        fastcgi_param SCRIPT_FILENAME $document_root$fastcgi_script_name;
        fastcgi_param QUERY_STRING    $query_string;
    }

    location ~ \.(gif|jpg|png)$ {
        root /data/images;
    }

}
2
3
4
5
6
7
8
9
10
11
12
13
14
15
16
17
18
19
20
# nginx upstream配置
在开发过程中,开发完成,完成测试阶段,修复bug后都要重启后台服务,测试又在测试,每次重启都要一两分钟,平凡的重启,测试不干了;所以想到就是部署两台服务器;用nginx upstream 模块实现 无感知部署,发现一个bug,修复;直接部署不会打断测试;
原来的测试环境部署的jenkins部署的,在一台机器中部署了,现在要需要增加一个部署一台机器;我们在jenkins的项目中部署脚本中再部署一个项目; 部署思想:打时间差,就是先后部署这两台机器,控制好时间,保证有一台机器可以使用;我在jenkins在部署的时候,用了一个sleep 100 来启动间隔,间隔是100秒,100秒后台,重新
启动第二台服务器; 服务器1 : 192.168.1.120:7851 服务器2 : 192.168.1.121:7851 废话不多说,直接上配置文件 test.conf (配置文件直接上)
upstream adminProxy{
      server 192.168.1.120:7851 weight=2 max_fails=3 fail_timeout=100s;
      server 192.168.1.121:7851 weight=2  max_fails=3 fail_timeout=100s;
   }

server {
    listen 80;
    server_name dev.manage.com;
    root /home/work/app/dist;
    index index.html;
    location /sys  {
        proxy_pass http://adminProxy;
        proxy_set_header Host $host;
        proxy_set_header X-Real-IP $remote_addr;
        proxy_set_header X-Forwarded-For $proxy_add_x_forwarded_for;
	proxy_next_upstream http_502 http_504 error timeout invalid_header;
    }
}
2
3
4
5
6
7
8
9
10
11
12
13
14
15
16
17
18
max_fails = 3 fail_timeout=100s 表示 ${fail_timeout}(100秒)时间内出现${max-fails}(3次)次失败,就会把这个机器状态置为down(下线),就是失败$(fail_timeout)(100秒)时间后,会重新尝试启用这服务器; 这样就配置好一个两台服务器负载均衡的配置了;
但是这还是不够的;因为这样的话,一个服务器要被请求3次才会被下线,也就是说,会有3次错误的请求;返回502或者是error; 所以我们还要启用proxy_next_upstream 功能: 在服务器返回502,504,错误,超时 的时候;允许转发到其他服务器; proxy_next_upstream http_502 http_504 error timeout invalid_header; 启用该功能需要在nginx.conf中添加 proxy_next_upstream on
注:就是在部署这两台服务器的时候,最好能够和这边nginx配置的服务器失败重试时间一致;这样nginx失败转发就不会出错,用户也会无感知;
附上怎么在jenkins中部署代码到另外一台机器上:
步骤: 1、两台服务器添加信任(ssh的互相信赖,这样在远程copy文件执行脚本的时候就不用密码连接,不知道的可以百度) 2、把jenkins编译好的文件远程copy到第二台服务器中 3、用jenkins远程调用启动脚本
直接上脚本: jenkins 部署脚本: sleep 100
scp ./admin/target/admin.jar root@192.168.1.121:/home/work/withhold-feature/admin7851.jar
ssh root@192.168.1.121 "/home/work/withhold-feature/start-jar.sh" 注:这个脚本是在启动第一台服务器(192.168.1.120)的时候执行,先停顿100s 在第一台服务器(192.168.1.120)启动完成后,再重新启动第二台服务器(129.168.1.121); scp是把本地文件拷贝到远程服务器中,然后用 ssh 远程执行start-jar.sh 脚本
在第二台服务器中的start-jar.sh 脚本
pid=ps -ef | grep admin7851.jar | grep -v grep | awk '{print $2}'if [ -n "$pid" ]then#!kill -9 强制终止
echo "kill -9 的pid:" $pid kill -9 $pidfi cd /home/work/withhold-feature
nohup java -jar admin7851.jar --server.port=7851 --spring.profiles.active=test >/dev/null &
# nginx虚拟路径映射
实现效果 location /img/ { root /home/user/image/; } 如果按照如上配置,那在浏览器中访问一定是 http://127.0.0.1/img/img_file.jpg 。它的请求将会这样映射:/home/user/image/img/img_file.jpg,这样没有错,但是如果按照这样配置访问的话,在 /home/user/image/ 文件下一定需要再有一个 img 文件夹。但是现在我想要的效果为img_file.jpg文件直接存在于image文件夹下,且访问时也要加上img这样一个路径标识。 需要实现的效果大致效果为: 请求 :http://127.0.0.1/img/img_file.jpg 映射为: /home/user/image/img_file.jpg 大致意思就是虽然配置了img这个路径标识,但是实际上我没有一个这样的文件夹。
配置实现 其实很简单,只需要使用 alias 这个指令。配置如下:
location /img/ { alias /home/user/image/; } 注:alias 后的路径最后需要加上 ‘/’ 不然会找不到文件。 这样就可以实现上述的需求。其实很好理解: 使用root的话它的实际映射为 root 后的路径 + location后的路径,也就是 /home/user/image/img/ , 使用alias的话等于location 后的路径是alias 后路径的别名。
# 反向代理 虚拟二级目录
在nginx中配置proxy_pass代理转发时,如果在proxy_pass后面的url加/,表示绝对根路径;如果没有/,表示相对路径,把匹配的路径部分也给代理走。
假设下面四种情况分别用 http://192.168.1.1/proxy/test.html 进行访问。
第一种: location /proxy/ { proxy_pass http://127.0.0.1/; } 代理到URL:http://127.0.0.1/test.html
注意其中关键的两点,
在location 后面的名称的末尾一定要加上/ 在proxy_pass后面代理地址的末尾也需要加上/
# Nginx何防止流量攻击
两种实现方式分别是基于Ehcache和Redis的session管理策略。 大家都知道服务器资源有限的,但是客户端来的请求是无限的(不排除恶意攻击), 为了保证大部分的请求能够正常响应,不得不放弃一些客户端来的请求,所以我们会采用Nginx的限流操作, 这种操作可以很大程度上缓解服务器的压力, 使其他正常的请求能够得到正常响应。 如何使用Nginx实现基本的限流,比如单个IP限制每秒访问100次。通过Nginx限流模块,我们可以设置一旦并发连接数超过我们的设置,将返回503错误给客户端。这样可以非常有效的防止CC攻击。再配合 iptables防火墙,基本上CC攻击就可以无视了。
如何使用 conf配置 #统一在http域中进行配置 #限制请求 limit_req_zone $binary_remote_addr $uri zone=api_read:20m rate=100r/s; #按ip配置一个连接 zone limit_conn_zone $binary_remote_addr zone=perip_conn:10m; #按server配置一个连接 zone limit_conn_zone $server_name zone=perserver_conn:100m;
server { listen 80; server_name test.domain.com; index login.do; location / { #请求限流排队通过 burst默认是0 limit_req zone=api_read burst=5; #连接数限制,每个IP并发请求为2 limit_conn perip_conn 2; #服务所限制的连接数(即限制了该server并发连接数量) limit_conn perserver_conn 1000; #连接限速 limit_rate 100k; proxy_pass http://test; } } upstream report { fair; server 172.16.0.10:8882 weight=1 max_fails=2 fail_timeout=30s; server 172.16.0.10:8881 weight=1 max_fails=2 fail_timeout=30s; }
配置说明 limit_conn_zone 是针对每个IP定义一个存储session状态的容器。这个示例中定义了一个100m的容器,按照32bytes/session,可以处理3200000个session。 limit_rate 300k; 对每个连接限速300k. 注意,这里是对连接限速,而不是对IP限速。如果一个IP允许两个并发连接,那么这个IP就是限速limit_rate×2。 burst=5; 这相当于在检查站req旁边放5个座位。如果某个请求当时超过速度限制被拦了,请他在空座位上坐着,等排队,如果检查站空了,就可以通过。如果连座位都坐满了,那就抱歉了,请求直接退回,客户端得到一个服务器忙的响应。所以说burst跟request_rate一点关系都没有,设成10000,就是1万个请求可以等着排队,而检查站还是1秒钟放行5个请求(龟速)。而且也不能一直排队,所以nginx还设了超时,排队超过一定时间,也是直接退回,返回服务器忙的响应。 以上配置Nginx需要配置以下模块: ngx_http_limit_conn_module (static) ngx_http_limit_req_module (static) 执行命令 nginx -V 就可以检查到是否有安装。
# 配置503错误
默认情况,超出限制额度,将会报503错误,提示: 503 Service Temporarily Unavailable The server is temporarily unable to service your request due to maintenance downtime or capacity problems. Please try again later. Sorry for the inconvenience. Please report this message and include the following information to us. Thank you very much!
这样显示没毛病,但是不够友好,这里我们自定义503错误。 error_page 500 502 503 504 /50x.html; location = /50x.html { root html;#自定义50X错误 }
# nginx优化项
· 隐藏nginx版本
· nginx 配置项优化
· 开启高效传输模式
· fastcgi 调优
· gzip 调优
· expires 缓存调优
· 内核参数优化
· 系统连接数的优化
准备nginx测试环境
nginx安装略
准备测试文件
  vim /usr/local/nginx/conf/nginx.conf
  echo 'Hello world ' > /usr/local/nginx/html/index.html
2
启动nginx服务
systemctl start nginx[root@localhost ~]# curl -I http://172.16.46.114
HTTP/1.1 200 OK
Server: nginx/1.12.2   #这里显示版本号
Date: Sat, 04 Jul 2020 05:20:43 GMT
Content-Type: text/html
Content-Length: 13
Last-Modified: Sat, 04 Jul 2020 03:57:39 GMT
Connection: keep-alive
ETag: "5efffe33-d"
Accept-Ranges: bytes
[root@localhost ~]# [root@localhost ~]# [root@localhost ~]# curl  http://172.16.46.114
Hello world
2
3
4
5
6
7
8
9
10
11
12
13
# 隐藏nginx版本的2种方法
通过修改nginx配置文件的方法
在HTTP字段添加下
再次查看请求头
[root@localhost ~]# systemctl restart nginx
[root@localhost ~]# curl -I http://172.16.46.114
HTTP/1.1 200 OK
Server: nginx
Date: Sat, 04 Jul 2020 05:22:34 GMT
Content-Type: text/html
Content-Length: 13
Last-Modified: Sat, 04 Jul 2020 03:57:39 GMT
Connection: keep-alive
ETag: "5efffe33-d"
Accept-Ranges: bytes
2
3
4
5
6
7
8
9
10
11

重新编译法
修改源码包文件src/core/nginx.h
[root@localhost src]# cd nginx-1.12.2/
[root@localhost nginx-1.12.2]# vim src/core/nginx.h
[root@localhost nginx-1.12.2]# vi src/http/ngx_http_header_filter_module.c
#彻底隐藏HTTP 头信息中的 connection 字段
[root@localhost nginx-1.12.2]# vi src/http/ngx_http_special_response.c
#隐藏错误页面版本显示
[root@localhost nginx-1.12.2]# make && make install
2
3
4
5
6
7
src/core/nginx.h 修改如下:
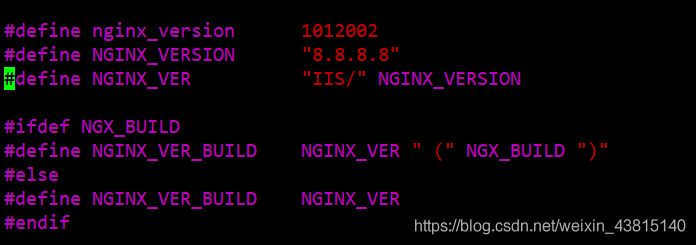
[root@www nginx-1.12.2]# vi src/http/ngx_http_header_filter_module.c
修改前:
static char ngx_http_server_string[] = "Server: nginx" CRLF; //第 49 行
修改后:
static char ngx_http_server_string[] = "Server: IIS" CRLF;
2
3
4
5
[root@www nginx-1.12.2]# vi src/http/ngx_http_special_response.c
修改前
static u_char ngx_http_error_tail[] = //第 29 行"<hr><center>nginx</center>" CRLF"</body>" CRLF"</html>" CRLF;
修改后
static u_char ngx_http_error_tail[] ="<hr><center>IIS</center>" CRLF"</body>" CRLF"</html>" CRLF;
[root@localhost ~]# nginx -v
nginx version: IIS/8.8.8.8
2
3
4
5
6
7
# nginx配置项优化
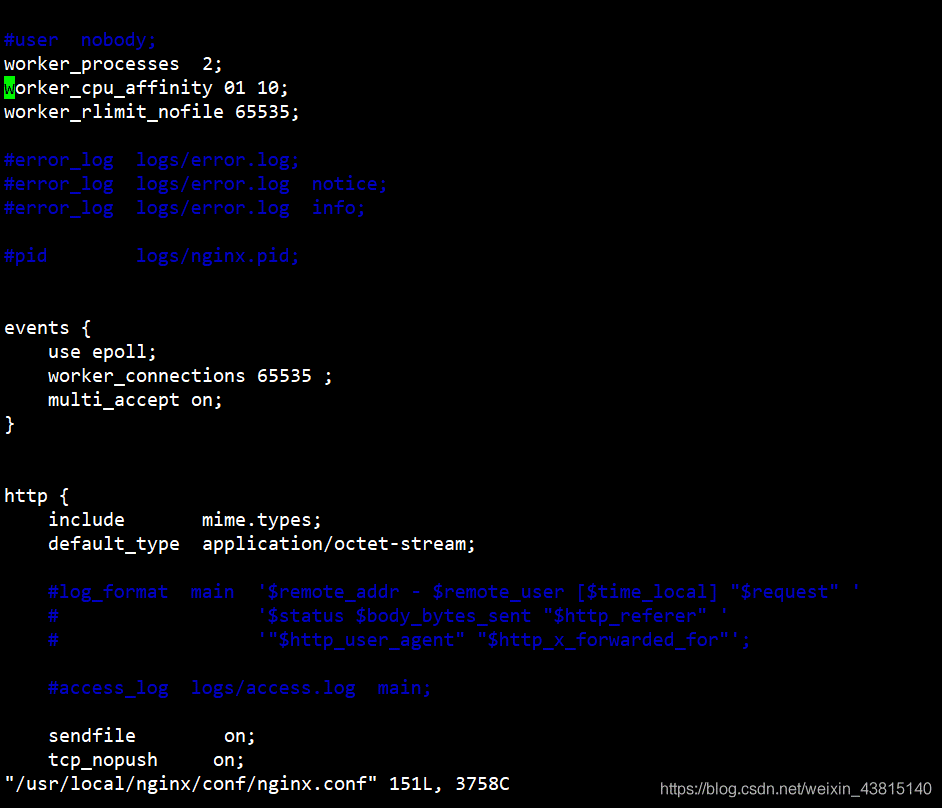
nginx运行CPU亲和力
worker_processes 4;
worker_cpu_affinity 0001 0010 0100 1000
2
8核如下
worker_processes 8;
worker_cpu_affinity 00000001 00000010 00000100 00001000 00010000 00100000 01000000
10000000;
2核如下: worker_processes 2; worker_cpu_affinity 0101 1010;
nginx最多可以打开的文件数
一个工作进程(worker process)建立一个连接后,进程将会打开一个文件副本,所以这个数(worker_connections)的大小还和操作系统设定的进程最大可打开的文件副本数有关。
worker_rlimit_nofile 65535;
#这个指令是指当一个 nginx 进程打开的最多文件描述符数目,理论值应该是最多打开文件数
(ulimit -n)与 nginx 进程数相除,但是 nginx 分配请求并不是那么均匀,所以最好与 ulimit -n
的值保持一致
2
3
4
#文件资源限制的配置可以在/etc/security/limits.conf 设置,针对 root/user 等各个用户或者*
代表所有用户来设置。
*              soft    nofile 65535
*              hard    nofile 65535
*              soft    noproc 65535
*       hard    noproc 65535
2
3
4
5
6
nginx事件处理模型
events {
use epoll;
worker_connections 65535;
multi_accept on;}
#nginx 采用 epoll 事件模型,处理效率高#work_connections 是单个 worker 进程允许客户端最大连接数,这个数值一般根据服务器性
能和内存来制定,实际最大值就是 `worker 进程数乘以 work_connections`
实际我们填入一个 65535,足够了,这些都算并发值,一个网站的并发达到这么大的数量,
也算一个大站了!`multi_accept 告诉 nginx 收到一个新连接通知后接受尽可能多的连接`
2
3
4
5
6
7
8
开启高效传输模式
http {
include mime.types;
default_type application/octet-stream;
……
sendfile on;
tcp_nopush on;
……
2
3
4
5
6
7
注释:
# Include mime.types; //媒体类型, include 只是一个在当前文件中包含另一个文件内容的指令# default_type application/octet-stream; //默认媒体类型足够# sendfile on; //开启高效文件传输模式,# tcp_nopush on; 必须在 sendfile 开启模式才有效,防止网路阻塞,积极的减少网络报文段的数量
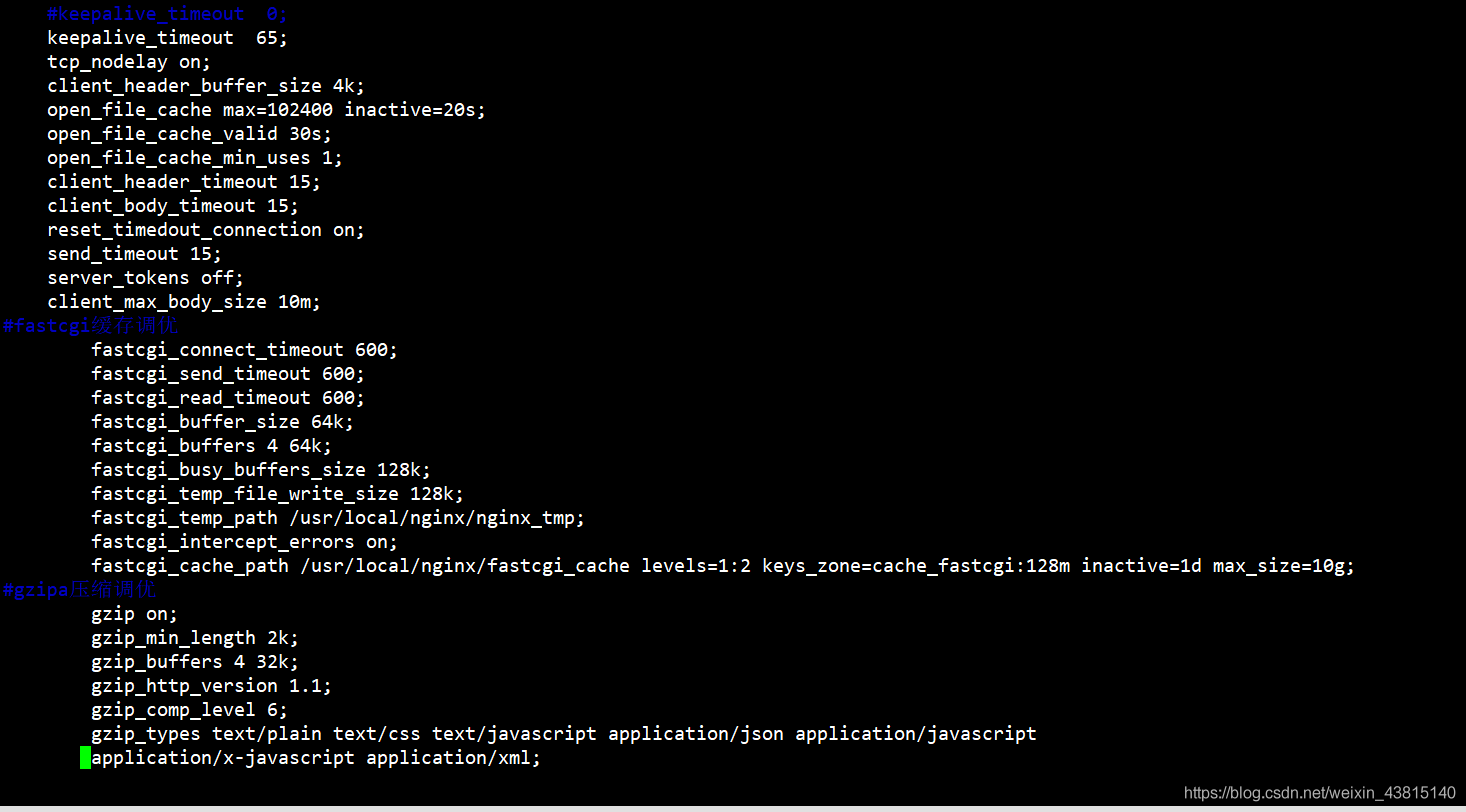
连接超时时间
keepalive_timeout 60;
tcp_nodelay on;
client_header_buffer_size 4k;
open_file_cache max=102400 inactive=20s;
open_file_cache_valid 30s;
open_file_cache_min_uses 1;
client_header_timeout 15;
client_body_timeout 15;
reset_timedout_connection on;
send_timeout 15;
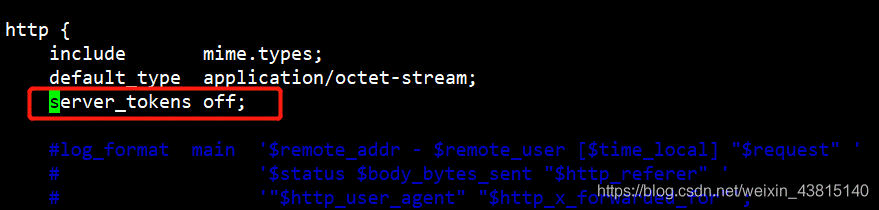
server_tokens off;
client_max_body_size 10m;
# keepalived_timeout; 客户端连接保持会话超时时间,超过这个时间,服务器断开这个链接# tcp_nodelay;也是防止网络阻塞,不过要包涵在 keepalived 参数才有效# client_header_buffer_size 4k; 客户端请求头部的缓冲区大小# open_file_cache max=102400 inactive=20s;这个将为打开文件指定缓存,默认是没有启用的# open_file_cache_valid 30s;这个是指多长时间检查一次缓存的有效信息。# open_file_cache_min_uses 1;# open_file_cache 指令中的 inactive 参数时间内文件的最少使用次数,如果超过这个数字,文件描述符一直是在缓存中打开的# client_header_timeout 设置请求头的超时时间# client_body_timeout 设置请求体的超时时间# reset_timeout_connection 告诉 nginx 关闭不响应的客户端连接。# send_timeout 响应客户端超时时间# server_tokens 并不会让 nginx 执行的速度更快,但它可以关闭在错误页面中的 nginx 版本数字,这样对于安全性是有好处的。# client_max_body_size; 上传文件大小限制
2
3
4
5
6
7
8
9
10
11
12
13
fastcgi与proxy 缓存调优
nginx 的 web 缓存功能的主要是由 proxy_cache、fastcgi_cache 指令集和关指令收集完成。
proxy_cache ``指令负责反向代理缓存后端服务器的静态内容
fastcgi_cache ``主要用来处理FastCGI 动态进程缓存
 client_max_body_size 10m;
 client_body_buffer_size 128k;
 proxy_connect_timeout 75;
 proxy_send_timeout 75;
 proxy_read_timeout 75;
 proxy_buffer_size 4k;
 proxy_buffers 4 32k;
 proxy_busy_buffers_size 64k;
 proxy_temp_file_write_size 64k;
 proxy_buffering on;
 proxy_temp_path /usr/local/nginx/proxy_temp;
 proxy_cache_path /usr/local/nginx/proxy_cache levels=1:2 keys_zone=my-cache:100m
 max_size=1000m inactive=600m max_size=2g;
2
3
4
5
6
7
8
9
10
11
12
13
14
15
nginx做反向代理转发优化
代理参数
proxy_set_header Host $http_host;
proxy_set_header X-Real-IP $remote_addr;
proxy_set_header X-Forwarded-For $proxy_add_x_forwarded_for;

proxy_connect_timeout 30;
proxy_send_timeout 60;
proxy_read_timeout 60;

proxy_buffering on;
proxy_buffer_size 32k;
proxy_buffers 4 128k;
2
3
4
5
6
7
8
9
10
11
如果nginx后面接的是动态的网站,需要fastcgi接口转发请求到(PHP)
缓存调优如下:
fastcgi_connect_timeout 600;
fastcgi_send_timeout 600;
fastcgi_read_timeout 600;
fastcgi_buffer_size 64k;
fastcgi_buffers 4 64k;
fastcgi_busy_buffers_size 128k;
fastcgi_temp_file_write_size 128k;
fastcgi_temp_path /usr/local/nginx/nginx_tmp;
fastcgi_intercept_errors on;
fastcgi_cache_path /usr/local/nginx/fastcgi_cache levels=1:2 keys_zone=cache_fastcgi:128m
inactive=1d max_size=10g;
2
3
4
5
6
7
8
9
10
11
转发调优如下:
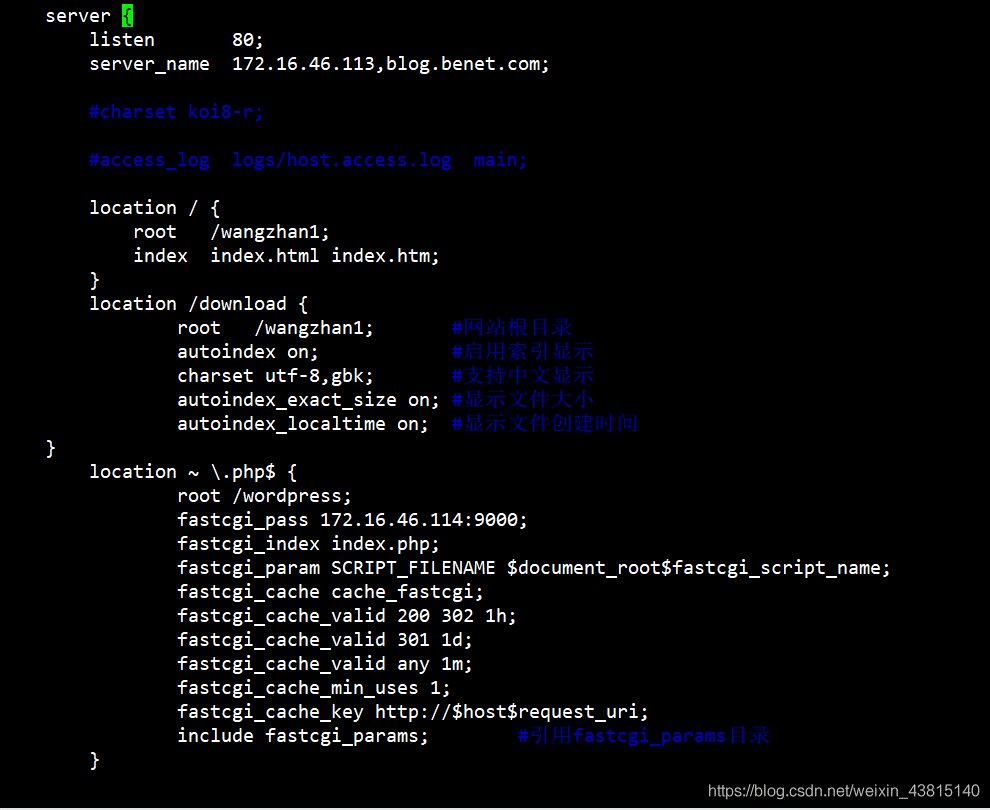
location ~ \.php$ {
                root /wordpress;
                fastcgi_pass 127.0.0.1:9000;
                fastcgi_index index.php;
                fastcgi_param SCRIPT_FILENAME $document_root$fastcgi_script_name;
                fastcgi_cache cache_fastcgi;
                           fastcgi_cache_valid 200 302 1h;
                               fastcgi_cache_valid 301 1d;
                               fastcgi_cache_valid any 1m;
                               fastcgi_cache_min_uses 1;
                               fastcgi_cache_key http://$host$request_uri;
                include fastcgi_params; #引用fastcgi_params目录
        }
2
3
4
5
6
7
8
9
10
11
12
13
14
注释:
fastcgi_connect_timeout 600; #指定连接到后端 FastCGI 的超时时间。
fastcgi_send_timeout 600; #向 FastCGI 传送请求的超时时间。
fastcgi_read_timeout 600; #指定接收 FastCGI 应答的超时时间。
fastcgi_buffer_size 64k; #指定读取 FastCGI 应答第一部分需要用多大的缓冲区,默认的缓冲区大小为 fastcgi_buffers 指令中的每块大小,可以将这个值设置更小。
fastcgi_buffers 4 64k; #指定本地需要用多少和多大的缓冲区来缓冲 FastCGI 的应答请求
fastcgi_busy_buffers_size 128k; #建议设置为 fastcgi_buffers 的两倍,繁忙时候的 buffer
fastcgi_temp_file_write_size 128k; #在写入 fastcgi_temp_path 时将用多大的数据块,默认值是 fastcgi_buffers 的两倍
fastcgi_temp_path #缓存临时目录
fastcgi_intercept_errors on;# 这个指令指定是否传递 4xx 和 5xx 错误信息到客户端,或者允许nginx 使用 error_page 处理错误信息
fastcgi_cache_path /usr/local/nginx/fastcgi_cache levels=1:2 keys_zone=cache_fastcgi:128m
inactive=1d max_size=10g; # fastcgi_cache 缓存目录
fastcgi_cache cache_fastcgi; #表示开启 FastCGI 缓存并为其指定一个名称.inactive 表示默认
失效时间,如果缓存数据在失效时间内没有被访问,将被删除,max_size 表示最多用多少硬盘空间
fastcgi_pass #指定 FastCGI 服务器监听端口与地址
fastcgi_cache_valid 200 302 1h; #用来指定应答代码的缓存时间,实例中的值表示将 200 和302 应答缓存一小时,要和 fastcgi_cache 配合使用
fastcgi_cache_valid 301 1d; #将 301 应答缓存一天
fastcgi_cache_valid any 1m; #将其他应答缓存为 1 分钟
fastcgi_cache_min_uses 3; #该指令用于设置经过多少次请求的相同 URL 将被缓存
fastcgi_cache_key http://$host$request_uri; #该指令用来设置web缓存的Key值,nginx根据Key
值 md5 哈希存 储 .一 般根 据$host( 域名 )、$request_uri(请 求的路 径 ) 等变 量组 合成
proxy_cache_key
2
3
4
5
6
7
8
9
10
11
12
13
14
15
16
17
18
19
20
21
gzip 调优
使用 gzip 压缩功能,可能为我们节约带宽,加快传输速度,有更好的体验
同时也要注意,我们使用 gzip 的功能是需要消耗 CPU 的!
Nginx 启用压缩功能需要你来 ngx_http_gzip_module 模块,一般我们需要压缩的内容有:文本,js,html,css,对于图片,视频,flash 什么的不压缩;
gzip on;
gzip_min_length 2k;
gzip_buffers 4 32k;
gzip_http_version 1.1;
gzip_comp_level 6;
gzip_types text/plain text/css text/javascript application/json application/javascript
application/x-javascript application/xml;
gzip_vary on;
gzip_proxied any;
gzip on; #开启压缩功能
gzip_min_length 1k; #设置允许压缩的页面最小字节数
gzip_buffers 4 32k; #压缩缓冲区大小
gzip_http_version 1.1; #压缩版本
gzip_comp_level 6; #压缩比例,1 压缩比最小,处理速度最快,9 压缩比最大,传输速度快,但是处理慢,也比较消耗 CPU 资源;6比较中性
gzip_types text/css text/xml application/javascript; #用来指定压缩的类型
gzip_vary on; #vary header 支持
2
3
4
5
6
7
8
9
10
11
12
13
14
15
16
expires 缓存调优
缓存,主要针对于图片,css,js 等元素更改机会比较少的情况下使用,特别是图片,占用
带宽大,我们完全可以设置图片在浏览器本地缓存 30d,css,js,html 可以缓存个 10 来天,
这样用户第一次打开加载慢一点,第二次,就非常快了!缓存的时候,我们需要将需要缓存
的拓展名列出来, Expires 缓存配置在 server 字段里面
location ~* \.(ico|jpeg|gif|png|bmp|swf|flv)$ {
 expires 30d;
 log_not_found off;
 access_log off;}
location ~* \.(js|css)$ {
 expires 7d;
 log_not_found off;
 access_log off;}
2
3
4
5
6
7
8
9
10
11
12
log_not_found off;是否在 error_log 中记录不存在的错误,默认是
# nginx整体配置优化
 关于系统连接数的优化
linux 默认值 open files 为 1024
修改open files 最大连接数
如下图:

编辑/etc/security/limits.conf
*       soft    nifile 65535
*       hard    nifile 65535
*       soft    noproc 65535
*       hard    noproc 65535
2
3
4
ulimit -n 65535 / reboot 保证本次会话生效
验证生效
[root@localhost ~]# ps -aux | grep nginx
root       1006  0.0  0.0 177032  1288 ?        Ss   08:31   0:00 nginx: master process /usr/local/nginx/sbin/nginx
nginx      1009  0.3  1.5 206252 28804 ?        S    08:31   0:00 nginx: worker process
nginx      1010  0.2  1.5 206252 28804 ?        S    08:31   0:00 nginx: worker process
nginx      1011  0.0  0.0 179272  1776 ?        S    08:31   0:00 nginx: cache manager process
root       3365  0.0  0.0 112656   960 pts/0    S+   08:33   0:00 grep --color=auto nginx[root@localhost ~]# cat /proc/1009/limits
Limit                     Soft Limit           Hard Limit           Units
Max cpu time              unlimited            unlimited            seconds
Max file size             unlimited            unlimited            bytes
Max data size             unlimited            unlimited            bytes
Max stack size            8388608              unlimited            bytes
Max core file size        0                    unlimited            bytes
Max resident set          unlimited            unlimited            bytes
Max processes             7179                 7179                 processes
Max open files            65535                65535                files
Max locked memory         65536                65536                bytes
Max address space         unlimited            unlimited            bytes
Max file locks            unlimited            unlimited            locks
Max pending signals       7179                 7179                 signals
Max msgqueue size         819200               819200               bytes
Max nice priority         0                    0
Max realtime priority     0                    0
Max realtime timeout      unlimited            unlimited            us
2
3
4
5
6
7
8
9
10
11
12
13
14
15
16
17
18
19
20
21
22
23
24
可见,openfile已经更改
# 负载均衡和反向代理
支持多种协议的反向代理
# upstream
四层反向代理
tcp,udp
七层反向代理
memcached,scgi,fastcgi,uwsgi,grpc,http,websocket
upstream name {...}
context: http
syntax: server address
地址可以是域名、IP地址、unix socket地址
通用参数
backup 备份server
down 标识服务器下线
加权Round-Robin负载均衡算法
weight 权重
max_conns
server的最大并发连接数,仅作用于单worker进程
max_fails
在fail_timeout时间段内,最大的失败次数。当达到最大失败时,会在fail_timeout秒内这台server不允许再次被选择
fail_timeout
单位为秒,默认值10秒。具有2个功能:
指定一段时间内,最大的失败次数max_fails.
到达max_fails后,该server不能访问的时间。
# 对上游服务使用keepalive长连接
通过复用连接,降低nginx与上游服务器建立、关闭连接的消耗,提升吞吐量的同时降低时延
模块 ngx_http_upstream_keepalive_module,默认编译进nginx,通过--without-http_upstream_keepalive_module移除
对上游连接的http头部设定
proxy_http_version 1.1;
proxy_set_header Connection;
upstream_keepalive的指令
keepalive connections;
context: upstrem
keepalive_requests number;
keepalived_timeout timeout;
指定上游服务域名解析的resolver指令
server {
	listen 8011;
	default_type text/plain;
	return 200 '8011 server response.\n';
}

server {
	listen 8012;
	default_type text/plain;
	return 200 '8012 server response.\n';
}
2
3
4
5
6
7
8
9
10
11
upstream rrups {
	server 127.0.0.1:8011 weight=2 max_conns=2 max_fails=2 fail_timeout=5;
	server 127.0.0.1:8012;
	keepalive 32;
}

server {
	server_name web.ops.com;
	error_log /var/log/nginx/myerror.log info;

	location / {
		proxy_pass http://rrups;
		proxy_http_version 1.1;
		proxy_set_header Connection "";
	}
}
2
3
4
5
6
7
8
9
10
11
12
13
14
15
16
tcpdump -i lo port 8011
基于客户端IP地址的hash算法实现负载均衡:upstream_ip_hash模块
ip_hash;
context: upstream
以客户端的IP地址作为hash算法的关键字,映射到特定的上游服务器中。
可以基于realip模块修改用于执行算法的IP地址
基于任意关键字实现hash算法的负载均衡:
upstream_hash模块
通过指定关键字作为hash key,基于Hash算法映射到特定的上游服务器中
关键字可以含有变量、字符串
hash key [consistent];
context: upstream
upstream iphashups {
	ip_hash;
	#hash user_$arg_username;
	server 127.0.0.1:8011 weight=2 max_conns=2 max_fails=2 fail_timeout=5;
    server 127.0.0.1:8012 weight=1;
}

server {
	set_real_ip_from 192.168.200.225;
	real_ip_recursive on;
real_ip_header X-Forwarded-For;
server_name iphash.opstand.com;
error_log /var/log/nginx/myerror.log info;
access_log /var/log/nginx/upstream_access.log;
location /{
proxy_pass http://iphashups;
proxy_http_version 1.1;
proxy_set_header Connection "";
}
}
2
3
4
5
6
7
8
9
10
11
12
13
14
15
16
17
18
19
20
21
curl -H 'X-Forwarded-For: 100.200.20.200' iphash.opstand.com
curl -H 'X-Forwarded-For: 100.200.20.200' iphash.opstand.com?username=bbbbbfssf
宕机或者扩容时,hash算法引发大量路由变更,可能导致缓存大范围失效
一致性hash算法:扩容前
使用一致性hash算法:upstream_hash模块
hash key [consitent];
context: upstream