JetLinks
# JetLinks 开源物联网平台
http://doc.jetlinks.cn/
JetLinks 基于Java8,Spring Boot 2.x,WebFlux,Netty,Vert.x,Reactor等开发, 是一个开源的企业级物联网基础开发平台,实现了物联网相关以及相关业务开发的众多基础功能, 能帮助你快速建立物联网相关业务系统。
点击添加官方QQ:①群(已满)2021514 (opens new window) (opens new window),②群324606263(opens new window) (opens new window)
在线演示地址: http://demo.jetlinks.cn (opens new window) (opens new window)用户名:test 密码: test123456. 测试用户未开放全部权限,建议本地运行社区版体验或者联系商务试用企业版.
# 核心特性
开放源代码
全部源代码开放,可自由拓展功能,不再受制于人.前后端分离,接口全开放.
统一设备接入,海量设备管理
TCP/UDP/MQTT/HTTP、TLS/DTLS、不同厂商、不同设备、不同报文、统一接入,统一管理.
规则引擎
灵活的规则模型配置,支持多种规则模型以及自定义规则模型 (opens new window). 设备告警,场景联动,均由统一的规则引擎管理.
强大的可视化规则设计器. 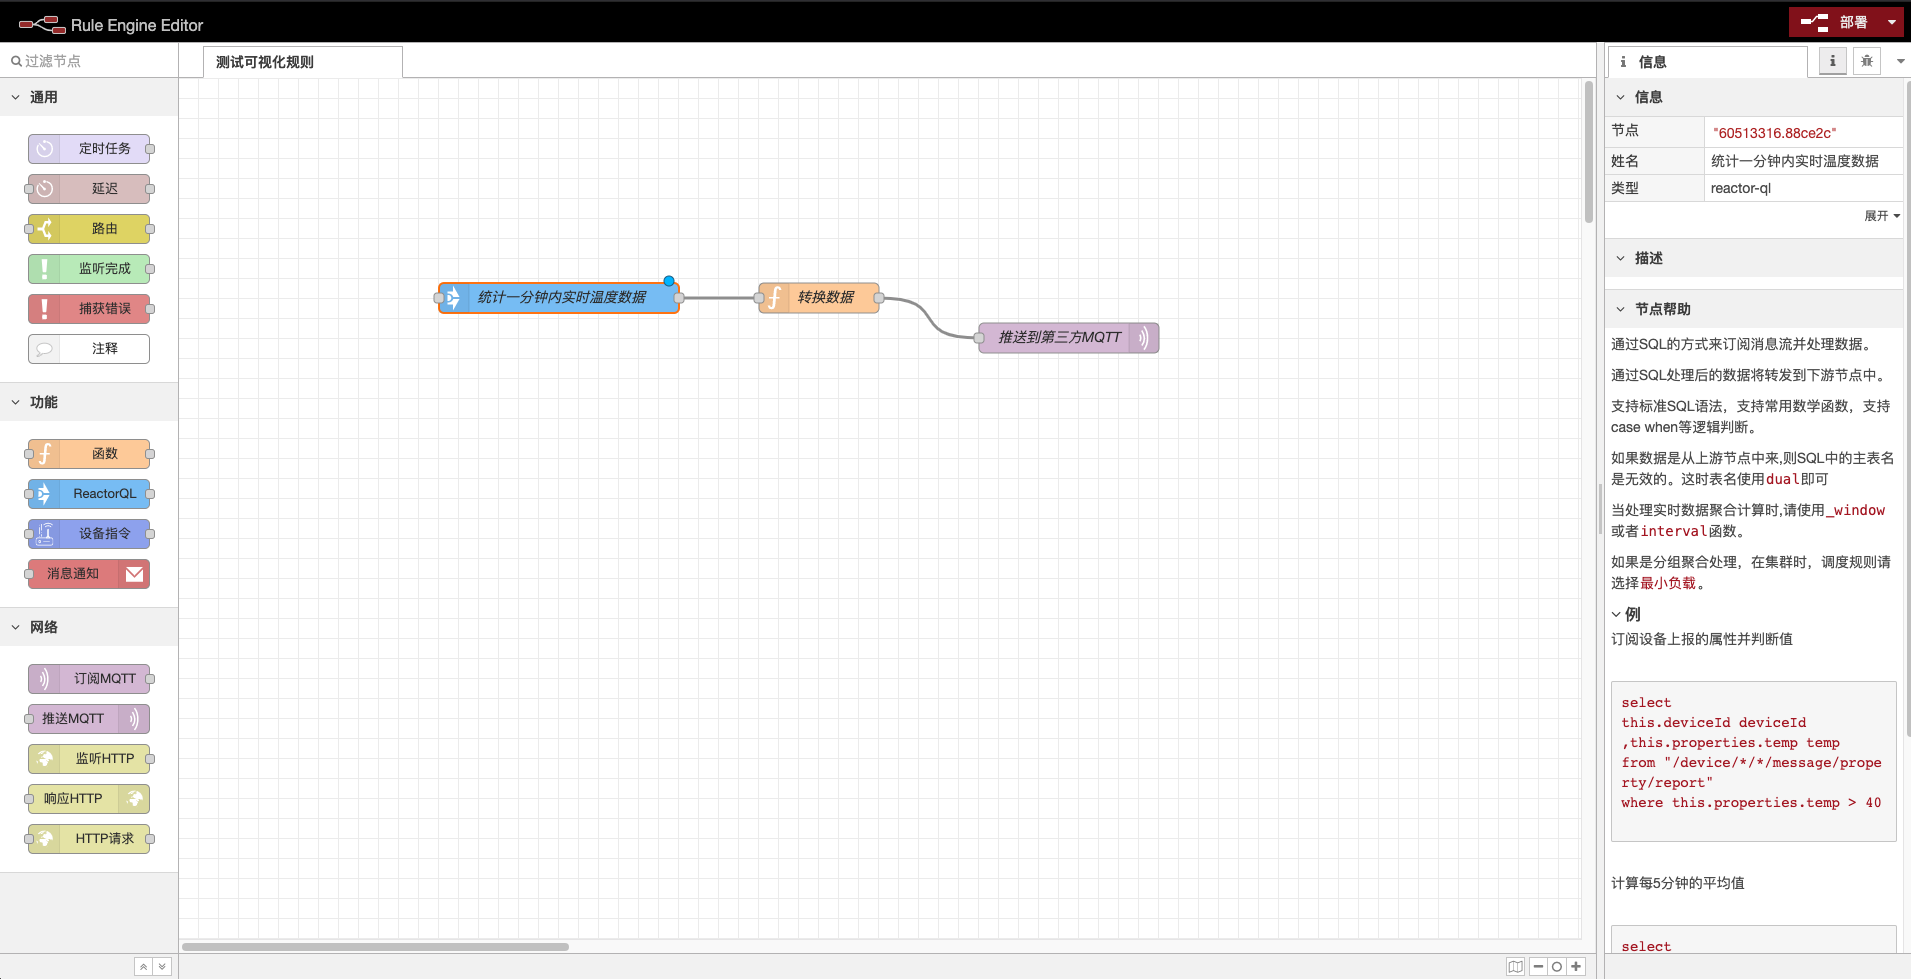
说明
可视化规则设计器基于node-red,后端使用纯java实现.
数据权限控制
灵活的非侵入数据权限控制 (opens new window)。可实现不同机构,不同用户共享数据。 可控制单条数据的操作权限。支持自定义维度(公司,部门...)
多种数据存储策略
支持灵活的设备数据存储策略 (opens new window),可将不同类型的设备数据存储到不同的地方。
# 技术栈
- Spring Boot 2.3.x(opens new window) (opens new window)
- Spring WebFlux (opens new window) (opens new window)响应式Web支持
- R2DBC (opens new window) (opens new window)响应式关系型数据库驱动
- Project Reactor (opens new window) (opens new window)响应式编程框架
- Netty (opens new window) (opens new window),Vert.x (opens new window) (opens new window)高性能网络编程框架
- ElasticSearch (opens new window) (opens new window)全文检索,日志,时序数据存储
- Redis (opens new window) (opens new window)Redis,设备配置,状态管理,缓存.
- PostgreSQL (opens new window) (opens new window)业务功能数据管理
- hsweb framework 4 (opens new window) (opens new window)业务功能基础框架
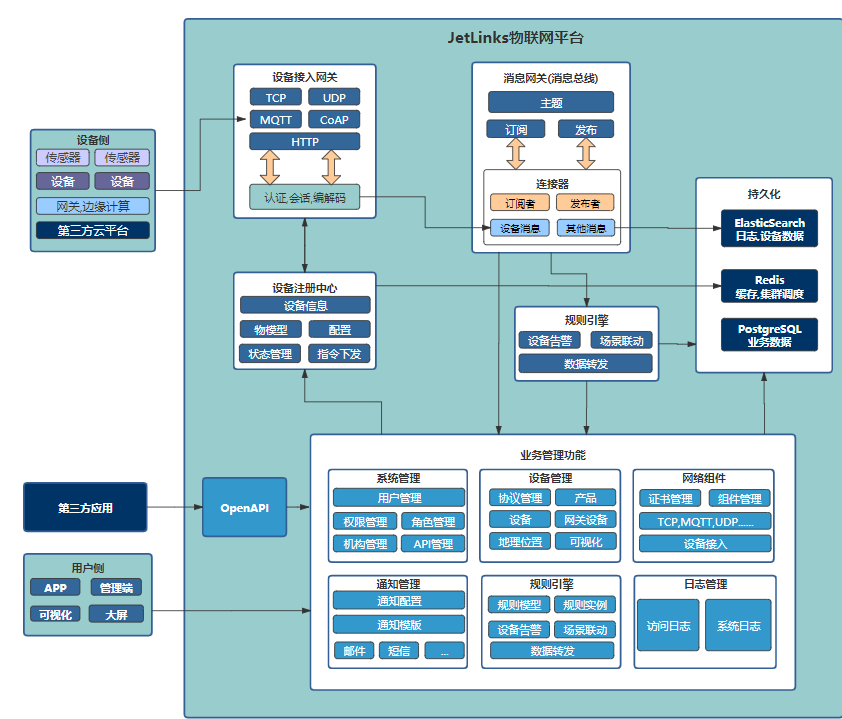
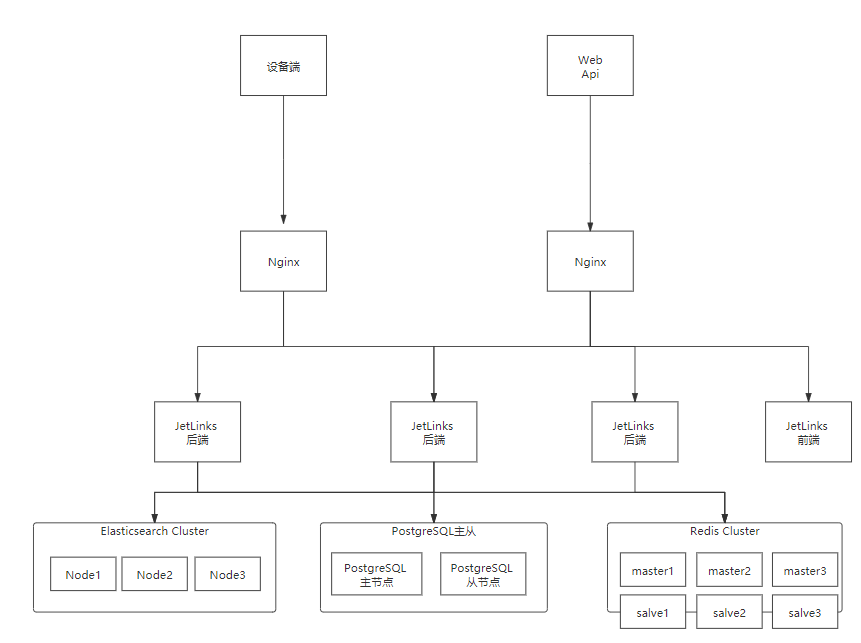
# 架构
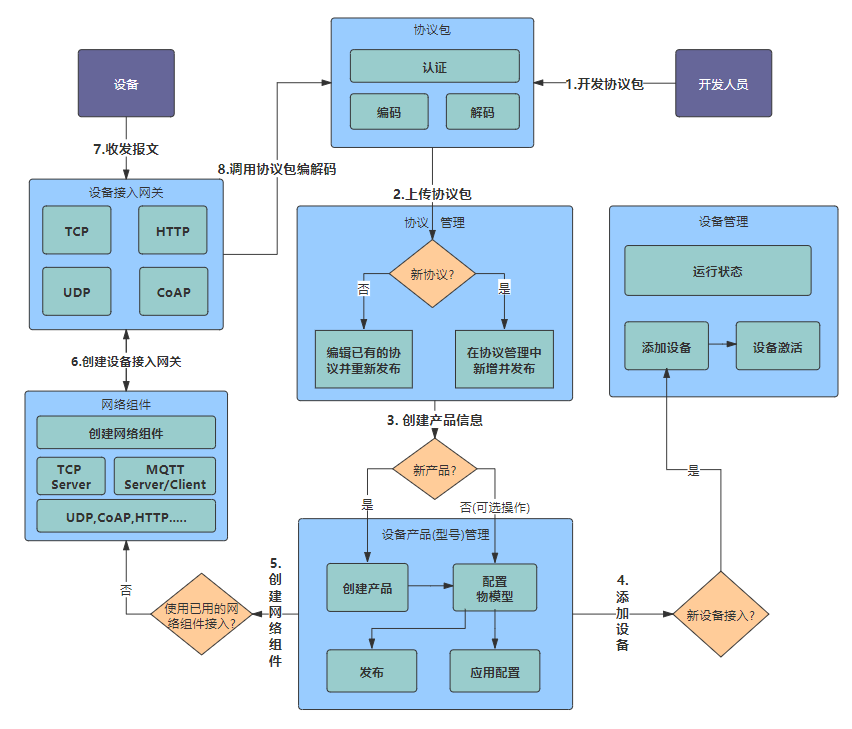
# 设备接入流程
使用Docker快速启动
# 安装docker
根据不同操作系统选择安装docker-ce或者Docker Desktop。
- Mac(opens new window) (opens new window)
- Linux(opens new window) (opens new window)
- Windows(opens new window) (opens new window)
# 获取源代码
jetlinks源代码托管在GitHub (opens new window) (opens new window)和gitee (opens new window) (opens new window),可直接前往克隆或者下载。
建议使用git clone。
$ git clone https://github.com/jetlinks/jetlinks-community.git && cd jetlinks-community
# 启动
获取源代码 (opens new window)成功后,进入docker/run-all目录。
$ cd docker/run-all
$ docker-compose up
2
注意:
docker-compose中的jetlinks、jetlinks-ui-antd镜像持续更新中,启动docker之前请及时下载更新。
# 启动成功后访问系统
地址: http://localhost:9000, 用户名:admin,密码:admin。
# 部署到服务器
# 前端部署
环境要求
- nodeJs v12.xx
- npm v6.xx
- 获取源代码
$ git clone https://github.com/jetlinks/jetlinks-ui-antd.git
- 使用npm打包,并将打包后的文件复制到项目的docker目录下(命令在项目根目录下执行)
npm install
npm run-script build
cp -r dist docker/
2
3
# 使用docker部署前端
- 构建docker镜像
docker build -t registry.cn-shenzhen.aliyuncs.com/jetlinks/jetlinks-ui-antd:1.10.0 ./docker
- 运行docker镜像
docker run -it --rm -p 9000:80 -e "API_BASE_PATH=http://xxx:8848/" registry.cn-shenzhen.aliyuncs.com/jetlinks/jetlinks-ui-antd:1.10.0
注意
环境变量API_BASE_PATH为后台API根地址. 由docker容器内进行自动代理. 请根据自己的系统环境配置环境变量: API_BASE_PATH
# 使用nginx部署
- 复制
dist目录下到文件到/usr/share/nginx/html - 添加nginx配置文件
nginx配置参考:
server {
    listen 80;
    # gzip config
    gzip on;
    gzip_min_length 1k;
    gzip_comp_level 9;
    gzip_types text/plain text/css text/javascript application/json application/javascript application/x-javascript application/xml;
    gzip_vary on;
    gzip_disable "MSIE [1-6]\.";

    root /usr/share/nginx/html;
    include /etc/nginx/mime.types;
    location / {
        index  index.html;
    }

    location ^~/jetlinks/ {
        proxy_pass http://jetlinks:8848/; #修改此地址为后台服务地址
        proxy_set_header X-Forwarded-Proto $scheme;
        proxy_set_header Host $host:$server_port;
        proxy_set_header X-Real-IP  $remote_addr;
        proxy_set_header X-Forwarded-For $proxy_add_x_forwarded_for;
        proxy_http_version 1.1;
        proxy_set_header Upgrade $http_upgrade;
        proxy_set_header Connection "upgrade";
        proxy_connect_timeout   1;
        proxy_buffering off;
        chunked_transfer_encoding off;
        proxy_cache off;
        proxy_send_timeout      30m;
        proxy_read_timeout      30m;
        client_max_body_size    100m;
    }
}
2
3
4
5
6
7
8
9
10
11
12
13
14
15
16
17
18
19
20
21
22
23
24
25
26
27
28
29
30
31
32
33
34
# 后端部署
# 使用docker部署后端
- 使用maven命令将项目打包 在代码根目录执行:
mvn clean package -Dmaven.test.skip=true
- 使用docker构建镜像
注意
请自行准备docker镜像仓库,此处以registry.cn-shenzhen.aliyuncs.com阿里云私有仓库为例。
$ cd ./jetlinks-standalone
$ docker build -t registry.cn-shenzhen.aliyuncs.com/jetlinks/jetlinks-standalone:latest .
2
- 推送镜像
$ docker push registry.cn-shenzhen.aliyuncs.com/jetlinks/jetlinks-standalone:latest
- 创建docker-compose文件
version: '2'
services:
  redis:
    image: redis:5.0.4
    container_name: jetlinks-ce-redis
    #    ports:
    #      - "6379:6379"
    volumes:
      - "redis-volume:/data"
    command: redis-server --appendonly yes --requirepass "redispassword"
    environment:
      - TZ=Asia/Shanghai
  elasticsearch:
    image: elasticsearch:6.8.11
    container_name: jetlinks-ce-elasticsearch
    environment:
      ES_JAVA_OPTS: -Djava.net.preferIPv4Stack=true -Xms1g -Xmx1g
      transport.host: 0.0.0.0
      discovery.type: single-node
      bootstrap.memory_lock: "true"
      discovery.zen.minimum_master_nodes: 1
      discovery.zen.ping.unicast.hosts: elasticsearch
    volumes:
      - elasticsearch-volume:/usr/share/elasticsearch/data
  #    ports:
  #      - "9200:9200"
  #      - "9300:9300"
  kibana:
    image: kibana:6.8.11
    container_name: jetlinks-ce-kibana
    environment:
      ELASTICSEARCH_URL: http://elasticsearch:9200
    links:
      - elasticsearch:elasticsearch
    ports:
      - "5602:5601"
    depends_on:
      - elasticsearch
  postgres:
    image: postgres:11-alpine
    container_name: jetlinks-ce-postgres
    volumes:
      - "postgres-volume:/var/lib/postgresql/data"
    ports:
      - "5432:5432"
    environment:
      POSTGRES_PASSWORD: jetlinks
      POSTGRES_DB: jetlinks
      TZ: Asia/Shanghai
  ui:
    image: registry.cn-shenzhen.aliyuncs.com/jetlinks/jetlinks-ui-antd:latest
    container_name: jetlinks-ce-ui
    ports:
      - 9000:80
    environment:
      - "API_BASE_PATH=http://jetlinks:8848/" #API根路径
    volumes:
      - "jetlinks-volume:/usr/share/nginx/html/upload"
    links:
      - jetlinks:jetlinks
  jetlinks:
    image: registry.cn-shenzhen.aliyuncs.com/jetlinks/jetlinks-standalone:latest
    container_name: jetlinks-ce
    ports:
      - 8848:8848 # API端口
      - 1883-1890:1883-1890 # 预留
      - 8000-8010:8000-8010 # 预留
    volumes:
      - "jetlinks-volume:/application/static/upload"  # 持久化上传的文件
      - "jetlinks-protocol-volume:/application/data/protocols"
    environment:
     # - "JAVA_OPTS=-Xms4g -Xmx18g -XX:+UseG1GC"
      - "TZ=Asia/Shanghai"
      - "hsweb.file.upload.static-location=http://127.0.0.1:8848/upload"  #上传的静态文件访问根地址,为ui的地址.
      - "spring.r2dbc.url=r2dbc:postgresql://postgres:5432/jetlinks" #数据库连接地址
      - "spring.r2dbc.username=postgres"
      - "spring.r2dbc.password=jetlinks"
      - "spring.redis.host=redis"
      - "spring.redis.port=6379"
      - "spring.redis.password=redispassword"#生产环境请配置redis密码
      # 生产环境下请配置es的密码,或者关闭公网访问
      - "spring.data.elasticsearch.client.reactive.endpoints=elasticsearch:9200"
#      - "spring.data.elasticsearch.client.reactive.username=admin"
#      - "spring.data.elasticsearch.client.reactive.password=admin"
#      - "spring.reactor.debug-agent.enabled=false" #设置为false能提升性能
#      - "jetlinks.device.storage.enable-last-data-in-db=true" # 开启记录最新数据到数据库,但是会降低吞吐量
      - "logging.level.io.r2dbc=warn"
      - "logging.level.org.springframework.data=warn"
      - "logging.level.org.springframework=warn"
      - "logging.level.org.jetlinks=warn"
      - "logging.level.org.hswebframework=warn"
      - "logging.level.org.springframework.data.r2dbc.connectionfactory=warn"
    links:
      - redis:redis
      - postgres:postgres
      - elasticsearch:elasticsearch
    depends_on:
      - postgres
      - redis
      - elasticsearch
volumes:
  postgres-volume:
  redis-volume:
  elasticsearch-volume:
  jetlinks-volume:
  jetlinks-protocol-volume:
2
3
4
5
6
7
8
9
10
11
12
13
14
15
16
17
18
19
20
21
22
23
24
25
26
27
28
29
30
31
32
33
34
35
36
37
38
39
40
41
42
43
44
45
46
47
48
49
50
51
52
53
54
55
56
57
58
59
60
61
62
63
64
65
66
67
68
69
70
71
72
73
74
75
76
77
78
79
80
81
82
83
84
85
86
87
88
89
90
91
92
93
94
95
96
97
98
99
100
101
102
103
104
105
106
注意:
jetlinks docker镜像版本更新和源代码根目录下文件pom.xml中的版本号同步。
6.运行docker-compose文件
docker-compose up -d
# jar包方式
1.使用maven命令将项目打包,在代码根目录执行:
./mvnw clean package -Dmaven.test.skip=true
2.将jar包上传到需要部署的服务器上。
jar包文件地址: jetlinks-standalone/target/jetlinks-standalone.jar
3.使用java命令运行jar包
$ java -jar jetlinks-standalone.jar
注意
请根据情况调整jvm参数等信息.
# 集群部署
jetlinks以及所需中间件的集群部署
注意:
仅企业版以上支持。 本文档以172.16.4.13、172.16.4.12、172.16.4.11三台服务器来搭建集群。
# 集群架构图
# redis集群安装配置
这里准备在一台服务器上搭建一个三主三从的redis集群。
- 安装redis 先下载redis (opens new window) (opens new window),本文档以redis5.0.5为例。 下载完成后进行解压、编译、安装。
注意:
redis是由C语言编写的,它的运行需要C环境,所以编译前需安装 gcc。
- 新建一个cluster文件夹,用来存放集群节点目录。 分别在172.16.4.11上创建7000、7003、7001、7004、7002、7005六文件夹,,这些节点分别使用7000、7003、7001、7004、7002、7005端口,以7000节点为例配置如下:
port 7000
bind 172.16.4.11
cluster-enabled yes
cluster-config-file nodes_7000.conf
cluster-node-timeout 5000
appendonly no
daemonize  yes
2
3
4
5
6
7
其他节点只需修改端口和文件名,依次按此进行配置即可,配置完成后启动节点。
注意:
建议appendonly在从节点开启,主节点关闭。
- 主从节点分配
redis-cli --cluster create 172.16.4.11:7000 172.16.4.11:7001 172.16.4.11:7002 172.16.4.11:7003 172.16.4.11:7004 172.16.4.11:7005 --cluster -replicas 1
注意:
其中-replicas 1表示每个主节点1个从节点
- 查看集群节点信息
ops@jetlinks-server-3:~/data/redis-5.0.5$ redis-cli -h 172.16.4.11  -p 7000 cluster nodes
562558e5afa0575d1059c47b9531a37cd75a9190 172.16.4.11:7003@17003 slave 9174a3ebcdbda174ec9189fbae0e38d9bbeeff5f 0 1594368796612 4 connected
bd974dbdd2f8447b27375c832c4c9c99328f4487 172.16.4.11:7005@17005 slave 3ab893f4cdcfaa52254a8cece2b54b561de29990 0 1594368797514 6 connected
9174a3ebcdbda174ec9189fbae0e38d9bbeeff5f 172.16.4.11:7002@17002 master - 0 1594368797615 3 connected 10923-16383
3ab893f4cdcfaa52254a8cece2b54b561de29990 172.16.4.11:7001@17001 master - 0 1594368797000 2 connected 5461-10922
238585a079196b0ab15ebb47ac681d42c083cdaf 172.16.4.11:7000@17000 myself,master - 0 1594368796000 1 connected 0-5460
d1ae6c623694c5f1fafc64d7abbeac4a9926ff49 172.16.4.11:7004@17004 slave 238585a079196b0ab15ebb47ac681d42c083cdaf 0 1594368796000 5 connected
2
3
4
5
6
7
redis集群搭建请参考redis官方文档(opens new window) (opens new window)
# elasticsearch集群安装配置
- 分别在三台服务器上安装elasticsearch 前往官网下载 (opens new window) (opens new window)。 下载完成后安装es。
- 配置elasticsearch.yml文件
ops@jetlinks-server-3:~/elasticsearch/config$ sudo vi elasticsearch.yml
# ======================== Elasticsearch Configuration =========================
#
# NOTE: Elasticsearch comes with reasonable defaults for most settings.
#       Before you set out to tweak and tune the configuration, make sure you
#       understand what are you trying to accomplish and the consequences.
#
# The primary way of configuring a node is via this file. This template lists
# the most important settings you may want to configure for a production cluster.
#
# Please consult the documentation for further information on configuration options:
# https://www.elastic.co/guide/en/elasticsearch/reference/index.html
#
# ---------------------------------- Cluster -----------------------------------
#
# Use a descriptive name for your cluster:
#
cluster.name: es-cluster
#
# ------------------------------------ Node ------------------------------------
#
# Use a descriptive name for the node:
#
node.name: node-3
#
# Add custom attributes to the node:
#
#node.attr.rack: r1
#
# ----------------------------------- Paths ------------------------------------
#
# Path to directory where to store the data (separate multiple locations by comma):
#
#path.data: /path/to/data
#
# Path to log files:
#
#path.logs: /path/to/logs
#
# ----------------------------------- Memory -----------------------------------
#
# Lock the memory on startup:
#
#bootstrap.memory_lock: true
#
# Make sure that the heap size is set to about half the memory available
# on the system and that the owner of the process is allowed to use this
# limit.
#
# Elasticsearch performs poorly when the system is swapping the memory.
#
# ---------------------------------- Network -----------------------------------
#
# Set the bind address to a specific IP (IPv4 or IPv6):
#
network.host: 172.16.4.11

transport.tcp.port: 9300
#
# Set a custom port for HTTP:
#
http.port: 9200
#
# For more information, consult the network module documentation.
#
# --------------------------------- Discovery ----------------------------------
#
# Pass an initial list of hosts to perform discovery when new node is started:
# The default list of hosts is ["127.0.0.1", "[::1]"]
#
discovery.zen.ping.unicast.hosts: ["172.16.4.13:9300", "172.16.4.12:19300","172.16.4.11:9300"]
#
# Prevent the "split brain" by configuring the majority of nodes (total number of master-eligible nodes / 2 + 1):
#
discovery.zen.minimum_master_nodes: 1
#
# For more information, consult the zen discovery module documentation.
#
# ---------------------------------- Gateway -----------------------------------
#
# Block initial recovery after a full cluster restart until N nodes are started:
#
#gateway.recover_after_nodes: 3
#
# For more information, consult the gateway module documentation.
#
# ---------------------------------- Various -----------------------------------
#
# Require explicit names when deleting indices:
#
#action.destructive_requires_name: true
2
3
4
5
6
7
8
9
10
11
12
13
14
15
16
17
18
19
20
21
22
23
24
25
26
27
28
29
30
31
32
33
34
35
36
37
38
39
40
41
42
43
44
45
46
47
48
49
50
51
52
53
54
55
56
57
58
59
60
61
62
63
64
65
66
67
68
69
70
71
72
73
74
75
76
77
78
79
80
81
82
83
84
85
86
87
88
89
90
91
三台服务器不同的配置:
#172.16.4.11
node.name: node-3
network.host:172.16.4.11
#172.16.4.12
node.name: node-2
network.host:172.16.4.12
#172.16.4.13
node.name: node-1
network.host:172.16.4.13
2
3
4
5
6
7
8
9
3 在三台服务器上分别启动es
./bin/elasticsearch
# 数据库启动
本文档案例使用docker启动postgresql,可参考docker-compose.yml (opens new window) (opens new window)文件中的postgresql配置。
# jetlinks集群安装配置
1.修改application.yml,并将jetlinks打成jar包
application.yml文件:
server:
  port: 8844
  max-http-header-size: 64KB
spring:
  profiles:
    active: dev
  application:
    name: jetlinks-platform
  jackson:
    date-format: yyyy-MM-dd HH:mm:ss
    time-zone: Asia/Shanghai
    serialization:
      WRITE_DATES_AS_TIMESTAMPS: true
    default-property-inclusion: non_null
  resources:
    static-locations: file:./static,classpath:/META-INF/resources/,classpath:/resources/,classpath:/static/, classpath:/public/
  redis:
    # redis集群配置
    cluster:
      nodes:
        - 172.16.4.11:7000
        - 172.16.4.11:7001
        - 172.16.4.11:7002
        - 172.16.4.11:7003
        - 172.16.4.11:7004
        - 172.16.4.11:7005
      max-redirects: 3
    lettuce:
      pool:
        max-active: 1024
    timeout: 20s
    serializer: jdk # 设置fst时,redis key使用string序列化,value使用 fst序列化.
    database: 0
  r2dbc:
    url: r2dbc:postgresql://172.16.4.12:5432/jetlinks    #数据库地址 本文档数据库为docker启动
    username: postgres
    password: jetlinks
    pool:
      max-size: 32
  codec:
    max-in-memory-size: 50MB
  rabbitmq: # 开启了device.message.writer.rabbitmq.enabled=true时生效
    host: localhost
    port: 5672
    username: admin
    password: jetlinks
  kafka:    # 开启了device.message.writer.kafka.enabled=true时生效
    consumer:
      client-id: ${spring.application.name}-consumer:${server.port}
      group-id: ${spring.application.name}
      max-poll-records: 1000
    producer:
      client-id: ${spring.application.name}-producer:${server.port}
      acks: 1
      retries: 3
    bootstrap-servers: ["127.0.0.1:9092"]
  reactor:
    debug-agent:
      enabled: true # 开启调试代理,在打印异常时将会生成调用踪栈信息
  data:
    elasticsearch:
      client:
        reactive:
          endpoints:
              - http://172.16.4.13:9200
              - http://172.16.4.12:19200
              - http://172.16.4.11:9200
          max-in-memory-size: 100MB
          socket-timeout: 10s
          connection-timeout: 15s
easyorm:
  default-schema: public # 数据库默认的schema
  dialect: postgres #数据库方言
elasticsearch:
  index:
    default-strategy: time-by-month #默认es的索引按月进行分表
    settings:
      number-of-shards: 3 # es 分片数量
      number-of-replicas: 0 # 副本数量
device:
  message:
    writer:
      time-series:
        enabled: true # 直接写出设备消息数据到时序数据库
      kafka:
        enabled: false  # 推送设备消息到kafka
        consumer: true  # 从kafka订阅消息并写入到时序数据库
        topic-name: device.message
      rabbitmq:
        enabled: false  # 推送设备消息到rabbitMQ
        consumer: true  # 从rabbitMQ订阅消息并写入到时序数据库
        thread-size: 4 # 消费线程数
        auto-ack: true  # 自定应答,为true可能导致数据丢失,但是性能最高。
        topic-name: device.message  # exchange名称
        ignore-message-types:
        include-message-types:
hsweb:
  cors:
    enable: true
    configs:
      - path: /**
        allowed-headers: "*"
        allowed-methods: ["GET", "POST", "PUT", "PATCH", "DELETE", "OPTIONS"]
        allowed-origins: ["*"]
        allow-credentials: true
        max-age: 1800
  dict:
    enum-packages: org.jetlinks
  file:
    upload:
      static-file-path: ./static/upload
      static-location: http://demo2.jetlinks.org:8080/upload   # 此地址为服务器域名,将通过nginx代理到固定服务器上
  webflux:
    response-wrapper: enabled #开启响应包装器(将返回值包装为ResponseMessage)
  #  auth:   #默认的用户配置
  #    users:
  #      admin:
  #        username: admin
  #        password: admin
  #        name: 超级管理员
  authorize:
    auto-parse: true
  cache:
    type: redis
    redis:
      local-cache-type: guava
jetlinks:
  server-id: ${spring.application.name}:${server.port} #设备服务网关服务ID,不同服务请设置不同的ID
  logging:
    system:
      context:
        server: ${spring.application.name}
  protocol:
    spi:
      enabled: false # 为true时开启自动加载通过依赖引入的协议包
rule:
  engine:
    server-id: ${jetlinks.server-id}
    server-name: ${spring.application.name}
logging:
  level:
    org.jetlinks: info
    rule.engine: info
    org.hswebframework: debug
    org.springframework.transaction: debug
    org.springframework.data.r2dbc.connectionfactory: debug
    io.micrometer: warn
    org.hswebframework.expands: error
    system: warn
    org.jetlinks.rule.engine: info
    org.jetlinks.gateway: info
    org.springframework: warn
    org.apache.kafka: warn
    org.jetlinks.pro.device.message.writer: debug
  #    org.elasticsearch: error
  config: classpath:logback-spring.xml
vertx:
  max-event-loop-execute-time-unit: seconds
  max-event-loop-execute-time: 30
  max-worker-execute-time-unit: seconds
  max-worker-execute-time: 30
  prefer-native-transport: true

micrometer:
  time-series:
    tags:
      server: ${spring.application.name}
    metrics:
      default:
        step: 30s
2
3
4
5
6
7
8
9
10
11
12
13
14
15
16
17
18
19
20
21
22
23
24
25
26
27
28
29
30
31
32
33
34
35
36
37
38
39
40
41
42
43
44
45
46
47
48
49
50
51
52
53
54
55
56
57
58
59
60
61
62
63
64
65
66
67
68
69
70
71
72
73
74
75
76
77
78
79
80
81
82
83
84
85
86
87
88
89
90
91
92
93
94
95
96
97
98
99
100
101
102
103
104
105
106
107
108
109
110
111
112
113
114
115
116
117
118
119
120
121
122
123
124
125
126
127
128
129
130
131
132
133
134
135
136
137
138
139
140
141
142
143
144
145
146
147
148
149
150
151
152
153
154
155
156
157
158
159
160
161
162
163
164
165
166
167
168
169
170
注意:
在多台服务器上启动jetlinks,配置中的jetlinks.server-id必须互不相同。
在项目根目录执行:
mvn clean package -DskipTests
- 分别在三台服务器上启动jetlinks 文档以脚本方式启动,脚本如下:
#!/bin/bash
nohup java -jar -Dspring.application.name=jetlinks-cluster-test-3   jetlinks-standalone.jar >jetlinks-pro.log 2>&1 &
2
注意:
三台服务启动的jetlinks.server-id应该互不相同,在application.yml中jetlinks.server-id引用了spring.application.name,所以此处的name应不相同。
# nginx配置
通过nginx来代理前后端。
- 安装nginx 前往官网下载 (opens new window) (opens new window)下载完成后解压、编译、安装。
- 修改配置文件
配置文件如下:
upstream iotserver {
  server 172.16.4.11:8844;
  server 172.16.4.12:8844;
  server 172.16.4.13:8844;
}

upstream webserver {
  server 172.16.4.11:9000;
}

upstream fileserver {
  server 172.16.4.11:8844; #此处指定文件上传到该服务器上
}

server {

  listen       8080;
  server_name  demo2.jetlinks.cn;

  location ^~/upload/ {
    proxy_pass http://fileserver;
    proxy_set_header Host $host:$server_port;
    proxy_set_header X-Real-IP  $remote_addr;
    proxy_set_header X-Forwarded-For $proxy_add_x_forwarded_for;
  }

  location ^~/jetlinks/file/static {
    proxy_pass http://fileserver/file/static;
    proxy_set_header X-Forwarded-Proto $scheme;
    proxy_set_header Host $host:$server_port;
    proxy_set_header X-Real-IP  $remote_addr;
    proxy_set_header X-Forwarded-For $proxy_add_x_forwarded_for;
    proxy_send_timeout      30m;
    proxy_read_timeout      30m;
    client_max_body_size    100m;
  }

  location ^~/jetlinks/ {
    proxy_pass http://iotserver/;
    proxy_set_header X-Forwarded-Proto $scheme;
    proxy_set_header Host $host:$server_port;
    proxy_set_header X-Real-IP  $remote_addr;
    proxy_set_header X-Forwarded-For $proxy_add_x_forwarded_for;
    proxy_http_version 1.1;
    proxy_set_header Upgrade $http_upgrade;
    proxy_set_header Connection "upgrade";
    proxy_connect_timeout   1;
    proxy_buffering off;
    chunked_transfer_encoding off;
    proxy_cache off;
    proxy_send_timeout      30m;
    proxy_read_timeout      30m;
    client_max_body_size    100m;
  }

  location / {
    proxy_pass http://webserver/;
  }
}
2
3
4
5
6
7
8
9
10
11
12
13
14
15
16
17
18
19
20
21
22
23
24
25
26
27
28
29
30
31
32
33
34
35
36
37
38
39
40
41
42
43
44
45
46
47
48
49
50
51
52
53
54
55
56
57
58
59
- 启动
systemctl status nginx.service
# tcp负载均衡配置方式
用于代理设备连接。此处使用nginx作为演示,也可以使用LVS,haProxy等方式。
配置文件:
load_module /usr/lib/nginx/modules/ngx_stream_module.so;
user  root;
worker_processes  1;

error_log  /etc/nginx/log/error.log warn;
pid        /var/run/nginx.pid;


events {
    worker_connections  1024;
}

stream {

   upstream tcp-test {
       hash $remote_addr consistent;
       server 172.16.4.13:1889 max_fails=3 fail_timeout=10s;
       #server 172.16.4.12:1889 max_fails=3 fail_timeout=10s;
       server 172.16.4.11:1889 max_fails=3 fail_timeout=10s;
   }

   server {

       listen 1884;

       proxy_pass tcp-test;

       proxy_connect_timeout 30s;

       proxy_timeout 30s;
   }
}
2
3
4
5
6
7
8
9
10
11
12
13
14
15
16
17
18
19
20
21
22
23
24
25
26
27
28
29
30
31
32
注意:
此配置监听的MQTT的1884端口,代理到服务器上的1889。如需代理自定义端口需保持代理端口与jetlinks平台中网络组件开启的端口一致。 如此处平台中MQTT服务网络组件设置的端口应为1889。
# 启动大屏
jetlinks的可视化数据大屏的前端是独立的,启动完jetlinks的平台前端和后端服务,如果你需要使用大屏可视化,还需要启动大屏前端。
注意
可视化数据大屏设计器基于Avue (opens new window) (opens new window)二次开发,暂未免费开源 (企业版中提供)
# 本地启动
下载大屏前端代码:
$ git clone https://github.com/jetlinks/jetlinks-big-screen.git
$ cd jetlinks-big-screen
2
修改后台接口地址:进入vue.config.js,修改后端请求地址
devServer: {
    proxy: {
        "/jetlinks": {
            target: "http://demo.jetlinks.cn/jetlinks", // 你的后端地址
                changeOrigin: true,
                ws: "ws://demo.jetlinks.cn/jetlinks", // 你的后端websocket地址
                pathRewrite: {
                '^/jetlinks': ''
            }
        },
    }
}
2
3
4
5
6
7
8
9
10
11
12
启动:
$ cd jetlinks-big-screen
$ npm install
$ npm run serve
2
3
# docker启动
可通过docker镜像启动大屏,执行性如下命令:
docker run -d -e "API_BASE_PATH=http://host.docker.internal:8844/" --name=big-screen -p 9002:80 registry.cn-shenzhen.aliyuncs.com/jetlinks-pro/jetlinks-big-screen:1.0.0
或者在docker-compose.yml中加入如下配置:
  big-screen:
    image: registry.cn-shenzhen.aliyuncs.com/jetlinks-pro/jetlinks-big-screen:1.0.0
    container_name: big-screen
    ports:
      - 9002:80
    environment:
      - "API_BASE_PATH=http://192.168.3.25:8844/" #API根路径
2
3
4
5
6
7
注意:
API_BASE_PATH为jetlinks服务地址。
# jetlinks配置修改
在jetlinks中修改大屏跳转地址: jetlinks-pro/jetlinks-standalone/src/main/resources/application.yml
api:
  urls:
    big-screen-path: http://localhost:9002/ #localhost根据大屏实际部署地址修改
2
3
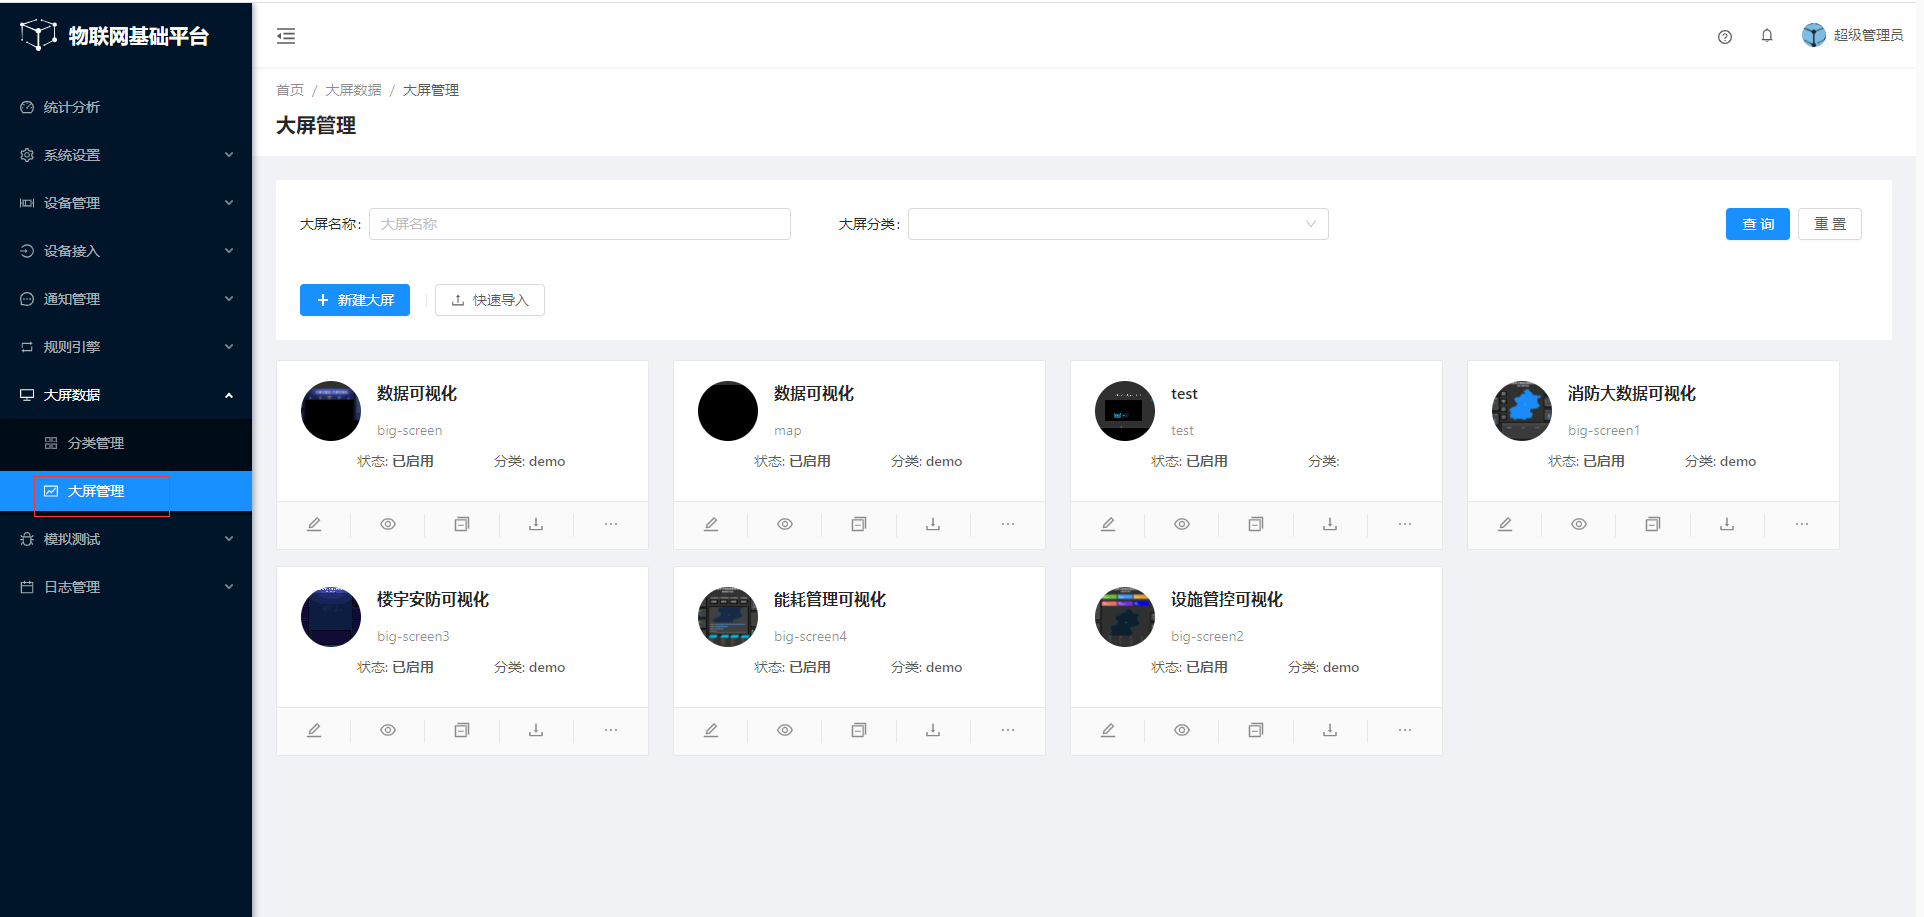
创建大屏权限:进入平台,系统设置=>权限管理=>新建

赋权:进入平台,系统设置=>用户管理=>赋权,给用户赋权:
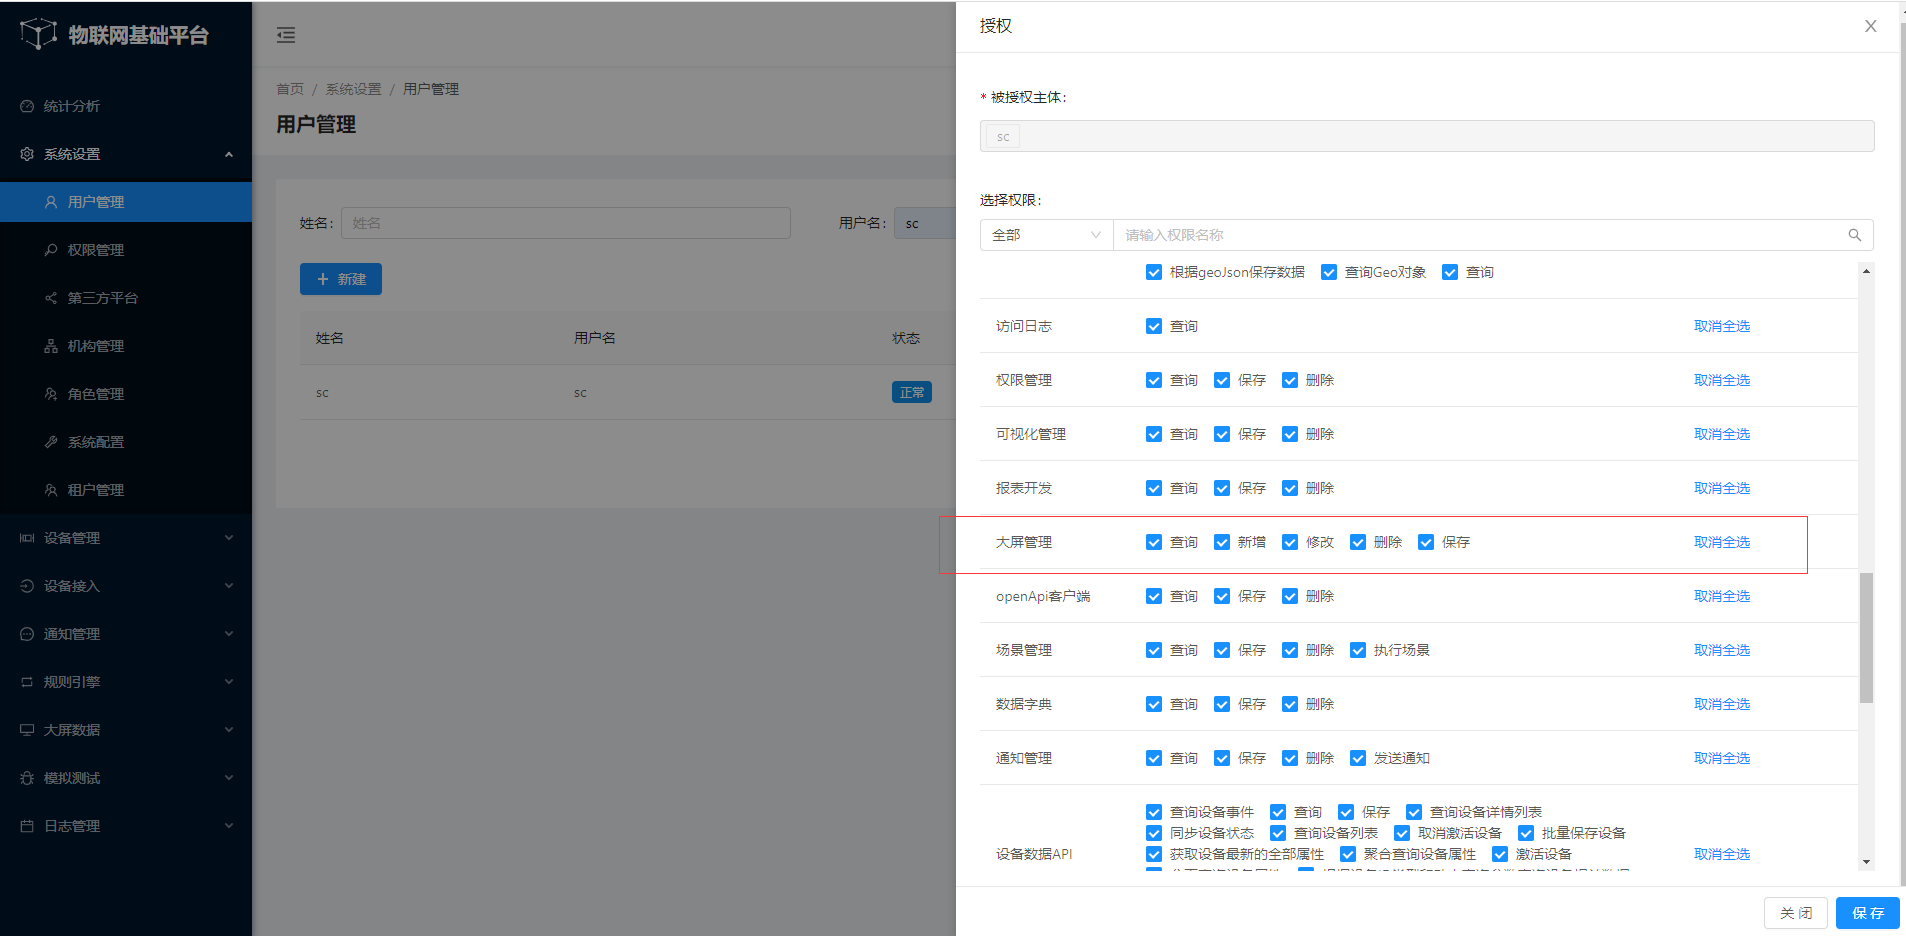
然后通过平台的大屏管理进入大屏: